
This summer has been quite the whirlwind, I can’t believe it’s just about over! I have been feverishly trying to finish three quilts for a quilt show and I still have a ways to go. Looks like late nights for me until Tuesday! Despite the looming deadline I decided to go to the Virginia Tech – Ohio State football game this weekend, which leads me to my first WIP, my upcoming HST Virginia pattern! (I’m also finishing up a Texas pattern I hope to have in my shop next week…the VA one is taking a bit longer).

While I hope to keep adding patterns to my shop, I also want to keep offering free content. One of my favorite things about the quilting community are the free tutorials and patterns you can find online. Today I am finally ready to post my Grand Granny Tutorial!
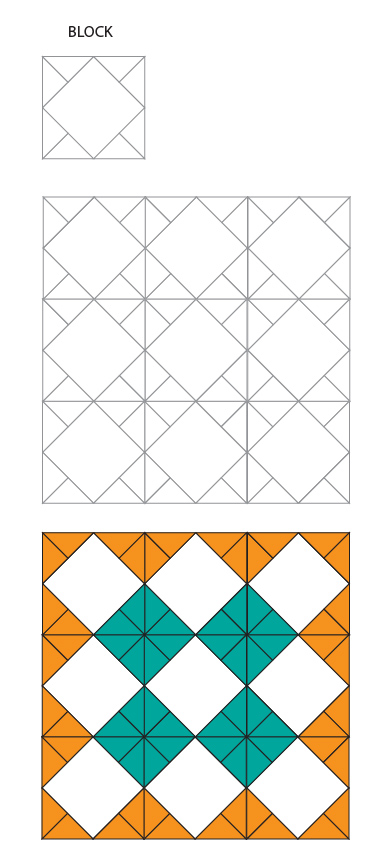
This quilt actually started as something larger, and I tweaked the pattern and worked it down to the baby quilt size. Let’s first take a look at the block and how the quilt works up:
Fabric Requirements and Cutting:
4 Teal Fat Eighths | 5 Orange Fat Eighths | 1/2 Yard White

Piecing Triangle Units:
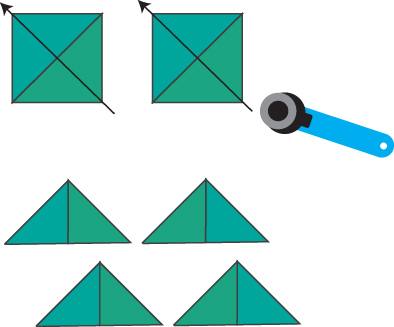
You are going to piece your orange and teal squares the same way. I’m going to refer to teal, just duplicate the steps with your orange squares.
1) Take 2 different teal prints and place them right sides together. Draw a diagonal line from one corner to the next on one of the squares. Sew 1/4 inch on both sides of the line.
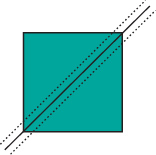
2) Rotary cut up the center diagonal that you drew. Open and Press.

3) Rotary cut up the diagonal of each square, as shown below. Repeat these steps for your orange and teal squares. Teal pairs with teal, orange pairs with orange.
Piecing your block:
1) Take your white square and mark the center of each side. I like to fold and iron a small crease. Take two of your triangle units and match the center seam to the center you just marked on your white square. Sew 1/4 inch along sides. Open and Press.

2) Take two more triangle units and repeat step 1 on the remaining sides.

Piecing the Top:
See breakdown of quilt blocks below.

Sew your blocks together and you have a Grand Granny baby quilt!

The fun thing about this block is you can play around with the arrangement of colors and make larger quilts. Here is a picture of where I was originally going with this quilt. It has been sitting on my shelf for months, waiting to be quilted. I’ll get around to it eventually!

Here is a coloring sheet just in case you want to play around with making a larger version quilt with these blocks. Enjoy!


Oh, I love this tutorial — such a cute baby quilt! And your VA quilt looks awesome. Good luck finishing up!
Thanks! Its gonna take a while to get the VA one done…I’m hoping my autumn is less hectic than my summer!
The VA HST quilt is amazing!! Let me know when you work on a Maine one 😉
I’m hopping over from WiP Wednesday at Freshly Pieced. 🙂
Thanks! If folks like the patterns I’d definitely want to make other states. 🙂 I’ll let you know if I do Maine!
Thank you, being a newbie I am sure I can follow your instructions. Very much appreciated.
I am a very visual person, so its easiest for me to explain things that way! Good luck!
I love your VA pattern, and can’t wait to see Texas. Printed out your template and getting ready to do some coloring.
I’m a JMU girl, personally, and can’t wait to get my hands on this pattern and tweak it to represent Harrisonburg and the Dukes! This is great 🙂
Jen, that is EXACTLY what I had in mind! When I designed it back in February I did it in Hokie colors, JMU colors and George Mason colors. 🙂 I’m hoping to get it done ASAP. When you finish your JMU version I’d love see it! I have tons of JMU friends and my brother-in-law is an alum.
This makes me absurdly happy! I LOVE that you designed it with the VA school colors in mind 🙂 Send your brother-in-law and your friends some purple and gold love for me, and thanks for designing such a great quilt pattern!