
Okey Dokey, here is my first attempt at a tutorial…feedback encouraged! Hopefully at least some of this makes sense. 🙂
I’m going to explain the ridiculous way I figured out how to do the gradient water/waves quilt. It is entirely possible there is a better way to do this, but this way worked for me, so hopefully it works for you!
First let’s take a look at the pattern repeat. The quilt is made up of two rows that repeat as many times as you’d like them to. You can use a variety of colors, but for this version I chose a six color version, seen below.

Here is a better look at how the blocks are pieced together to make up the rows:

As you can see above, there are 2 rows of 6 blocks each. All of those blocks will be made via strip piecing. Each strip set will produce 4 blocks, which is enough for a lap size throw in the end if you do 6 blocks across. To make the quilt shown in this tutorial you end up needing 12 strip sets to produce the 12 blocks above.
Now it is time to figure out the pesky colors and how many strips of each color you need. First, number your chosen colors (I literally pinned a piece of paper with a written number to each color fabric). Next, using the pattern repeat diagram and the colors chosen, number the colors and where they occur in your diagram, like below.
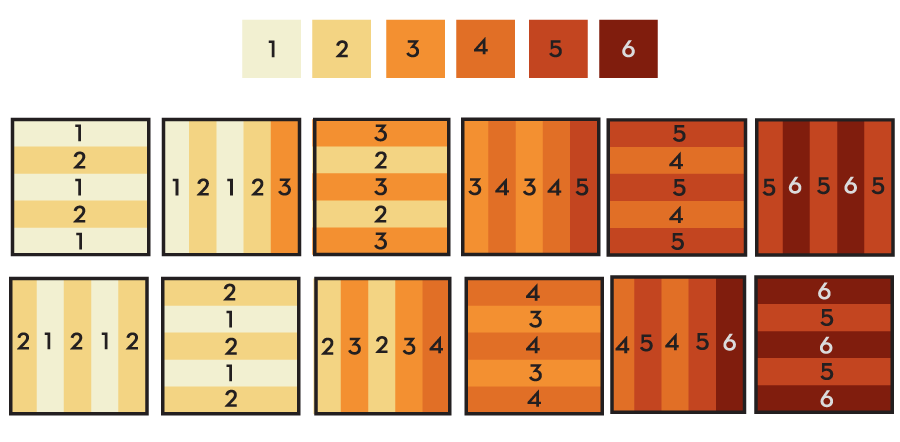
Now go through and count the number of times each color appears in the strips (ie; how many times the number 1 appears in the diagram, etc), and presto, the number of strips you need of each color! Write this down by your chosen colors and get to work cutting out your strips. Again, I kept the color number pinned to each stack of strips so I wouldn’t get confused, especially if you are using similar colors!

I cut my strips 2.25 inches so that I could end up getting 4 blocks per strip set. You can use 2.5 inches, but you only end up getting 3 blocks per strip set with a bunch of leftover fabric.
 After you’ve sewn your strips together it is time to cut them down to size. If you used a scant 1/4 inch as your seam allowance you’ll end up with your strip set being 9.25″ from top to bottom, and 42-44″ in length. Measure and cut down to 9.25″ squares.
 I next laid out my blocks according to the diagram and the repeat pattern. The lap size quilt is made up of 4 sets of the repeating pattern. See below:

Now, piece together your columns:

After you are done with your columns, sew them together and you should end up with something like this:

I went ahead and put together a diagram you can print and color in, since everyone doesn’t have the luxury of Adobe Illustrator. Works the same way, just color, number, and sew! The diagram includes more rows and columns than the tutorial quilt, just in case you want to try more colors.

If you end up making one, I’d love for you to comment on this post with a link to your blog post about it! Happy sewing everyone! Here is the blue version I have yet to quilt (Blogged here):


What a fabulous tutorial. Arrggghhh another beautiful quilt I must add to my to-do list!
Thank you! Kind of a pain to write out the whole numbers and stuff, but the strip piecing is so easy it makes up for it! I’d love to see it if you end up making one 🙂 They are so easy!
Great tutorial. Thanks so much for including the coloring diagram.
How much of each fabric did you use?
Around a half yard of each
I’m a newbie, and I think I can follow this – I’ll give it a try. Thank you!
Is there a way to print this as it will be a while before I get around to this one as I have so many in progress?
Excellent question! I’m new to blogging, but I’ll check with some of my blog savvy friends about uploading a pdf of instructions.
Have you managed to organize the pdf instructions? I have difficulty reading from screen and have to do printout to be able to follow your instructions. I love the quilt!!
If you go to http://www.printfriendly.com/ , you can get a PDF of any website you like, and it is easy to subtract the pieces you don’t need printed (ads, etc). And it creates a footer to remind you what the original website was 🙂
Oooh, good to know! I figured there had to be a good way to do it online somewhere. I have a pdf converter on my computer, so I guess I’m spoiled. Thanks for the tip!
Love it! I’m pinning it to save for later.
Wow, that was a lot of work on your part, to make it easy on our part! I would love to do this in blues/greens to really look like waves
Haha, I’m happy to make it easier on others! Waves were my initial inspiration and I did mine in blues. Blues and greens would also be gorgeous! If you work it up be sure to let me know. I’d love to see it!
I really like this quilt. Thank you for the excellent tutorial! How did you decide to quilt and bind it?
Thank you! I was going to quilt wavy lines, but am not happy with the outcome on my machine, so I’m going to do straight lines with variegated blue thread. 🙂 No clue yet on binding!
What size did you make each strip ?
2 1/4 inches…that way you can get more blocks from each strip set!
Thank you for the inspiration. Your instructions were very easy to understand. I’ve attached a copy of my version. It is a quilt I made for my adult son.
I love it!!!! I’m so excited someone made one of my patterns, thanks for sharing! Great job!
This is beautiful! I am also adding it to my “Must Do” list. I’ve been making quilts for friends and family (usually for new babies) for a few years now and have just started branching out from plain squares two years ago. I think I can do this 🙂
Great tutorial! easy to follow and nice clear diagrams – love it!
It all makes sense and makes it look so easy.
Just found this pinned, great tutorial! Your diagrams are fantistic. Thanks for sharing.
Love your quilt tute. Would especially like to be able to print your quilt and the instructions/pictures of how you did it so I can use it after I gather my fabric.
Thank you and I plan to make this.
I can’t wait to try this! My colors will be yellow, white, gray and black.
Thanks for sharing. I love this one! And with the help of your diagram, I just might try it this year 🙂
Karen in Maine
Great tutorial. I’m going to give it a try. Not sure of colors yet…thank you for doing this.
Great tutorial. It makes me want to try this. I will follow you!
I failed to realize that the number of strips necessary is for each set only (row 1 & 2, or 3 & 4), so I didn’t buy enough fabric. I bought fat quarters, so I’ll be going back to the store in a while to buy one more of each color. I’m making one that’s only 2 sets, to hang on a wall. I’m really excited about it.
2 1/2 wide but how long is each strip?
Width of fabric which is between 42-44 inches depending on the bolt!
Fabulous tutorial! I’ve pinned it, printed it out, and will start it ASAP! (Housework has been backburnered!) I even have a gradated pack of blues ready to cut immediately! Thanks so much for this tutorial. I look forward to many more! 🙂
Awesome! Be sure to post a link to pics when you’re done.
I LOVE this modern design!! Your Great chart shows that this is a simple way to get a more complex looking Quilt! Is the unfinished quilt top ~ 60″ X 80″? I am Brand new to quilting; great @ sewing, but fear of messing up w/ my expensive batiks gets in the way of my Starting a quilt. It seems like the key here is to just cut very precisely w/ my rotary cutter. I don’t want to spend $ on pre cut jelly rolls, so I have lots of incredible batik yardage begging for me to just ‘cut loose’! Any comments/ thoughts? Thanks!!
Hey Allison! My quilt ended up 53″x70.” The strips aren’t quite jelly roll width, they are 2 1/4 inches so you can get 4 blocks per strip set, so cutting them from yardage is ideal! You can just add more blocks to make whatever size you want. If you are afraid of hurting your batiks try piecing one set from muslin first so you get the feel for the pattern and then go from there. I sometimes do that so I don’t waste fabric experimenting. 🙂
Thanks SO much!! Finally going to do this.
Great tutorial,very nice pattern,well done,thanks.
Thank you Vivienne! I’m glad you like it!
Thanks SO much for the great response! Your site is now my “Go to”.
I love it when I learn something new, and Cindy C. shared something new that will be passed on to my friends. THANKS for the PDF tip! LOVELY quilt too!
Wow that is so gorgeous and so simple. I think I will make it for my grandson.
Thanks in support of sharing such a good idea, paragraph
is nice, thats why i have read it completely
thanks for share!
Got a quilt top with this pattern done today!
Love this pattern. 🙂
Awesome! I love seeing how other people interpret the pattern. Yours reminds me of fire.
I have 12 fat quarter batiks in light yellow to dark brown. Hunting for an appropriate pattern I found yours and love it. But will I be able to utilize fat quarters or do I need to put them aside and go buy new batiks? I see you used about 1/2 yard of each of 6 colors. Correct? I’m new to quilting but I’m sure I can handle this.
This pattern would make a quilt as you go so easy, I might have to try this style for my next quilt thank you for the ideal.