
Well, its been months since I said I’d post a tutorial on this, and thanks to Erica prodding me, here it is! (Seriously, thank you, I might not have ever gotten around to it, it had slipped my mind!).
What we are making:

For illustrative purposes we’ll work on a block that looks like this (in my current fave color combo):

CHOOSE FABRIC/CHARM SQUARES
I’m going to explain how to make this block from charm squares, or you can substitute fat quarters. If you make the block from charm squares you’ll need at least two sets of the same line. Each set usually has at least 2 of each print, and certain aspects of this block require 4 of each print.
For the block you’ll need a total of 11 charm squares, in 5 different prints/colorways, as seen below.

LET THE TRIMMING BEGIN!
Take the first 5 charm squares and trim them down from 5 inches squared to 4.5 inches squared. The outer edge of the pinking is where you should measure from.

Now, cut the next four charm squares in half to measure 2.5 inches by 5 inches (we’ll be trimming them again later after sewing).

Finally, take your last two charm squares and cut them in half twice, so that they are quartered and measure 2.5 inches square.

You should end up with the following pieces:

PIECE OUT MY FRIENDS!
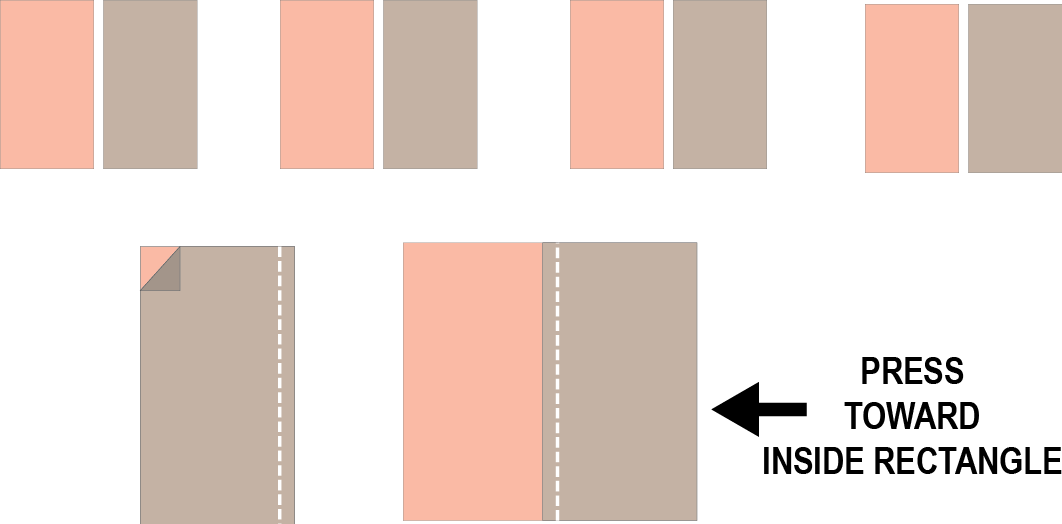
Let’s work on the cross part of the block first, highlighted in yellow here:

Take each of your 2.5 x 5 inch strips and pair them with a strip of the opposite color. Sew 1/4 inch up the side and press toward the block that will be towards the center of the block, see diagram below.
The blocks above should end up measuring 4.5 inches by 5 inches…let’s trim them down to be 4.5 inches square.

We’re almost there! Now lets piece together the last four pieces of our nine-patch.

Don’t hate me, we are going to do these blocks the wasteful way. Take each of your 8 mini 2.5 inch squares and draw a line from one corner to the other (do this on all 8).

The lines you just drew will be the lines you sew on. Set-up your four remaining 4.5 squares as seen in the diagram below, this is an excellent place to start pinning. 🙂 Please note, the tiny squares WILL slightly overlap one another since they are 5 inch charms quartered and the square you are pinning them to is only 4.5 inches square. Once you have them pinned, sew along the lines you just drew.

Now you are going to trim 1/4 inch outside the line you just sewed on each small square.

Press outward towards the corners of the smaller squares:

YAY! The 9 blocks are ready to piece together!
MAKE IT WORK
Now we are going to sew each of the three rows together. I had you press in certain directions so that the seams would nest together and not get too bulky. Go ahead and press the top and bottom row towards the center block of that row, and for the center row press out to the sides so that all three rows will ultimately nest together.

Now sew those rows together and you’ve got a block! The block is really very simple to make, I just wanted to be very detailed explaining it, don’t let it intimidate you!

Lovely clear tute 🙂
E xx
Thank you!! I always worry I’m either over or under informing 🙂
Pingback: So many ideas, so little time | mustlovequilts
Thanks! It is so cute! I cannot wait to make it!
wow that is amazing – I love your tutorial breakdowns amazing and makes me think I can do that!
thank you