
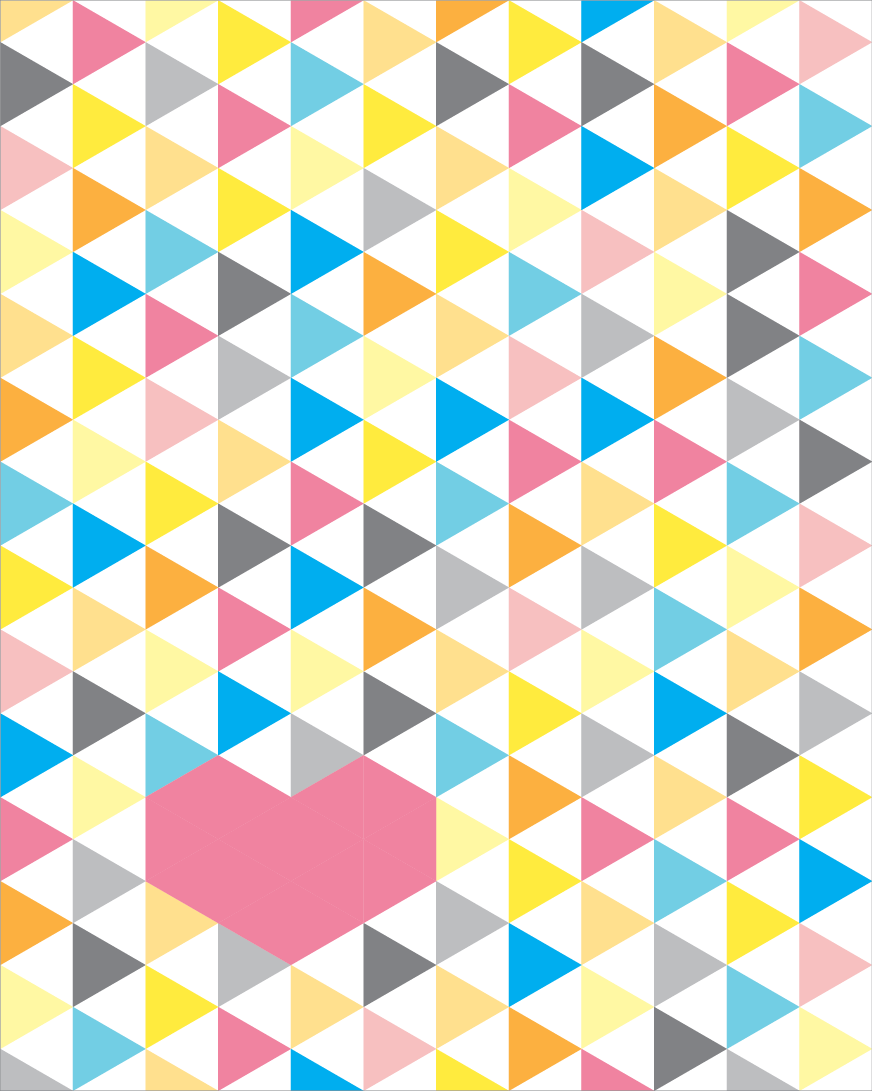
I have been wanting to make a pixel heart quilt, a scrappy quilt, and an equilateral triangle quilt for a while now. I ultimately decided to combine the three and now I have my very own equilateral scrappy heart quilt! I painstakingly cut 3 small triangles out of 60% of my stash (in a particular colorway of course, I’m still too uptight to go too scrappy) and came up with the quilt below. I initially had an entirely different quilt in mind, but after playing on my design wall, decided this was the best option. I think it is my favorite quilt I’ve made! I still need to quilt it, but wanted to post it in time for Valentine’s Day. Here it is!!! Big thanks to my lil sis for holding it up for one of the photos. (Linking up to Freshly Pieced for WIP Wednesday)
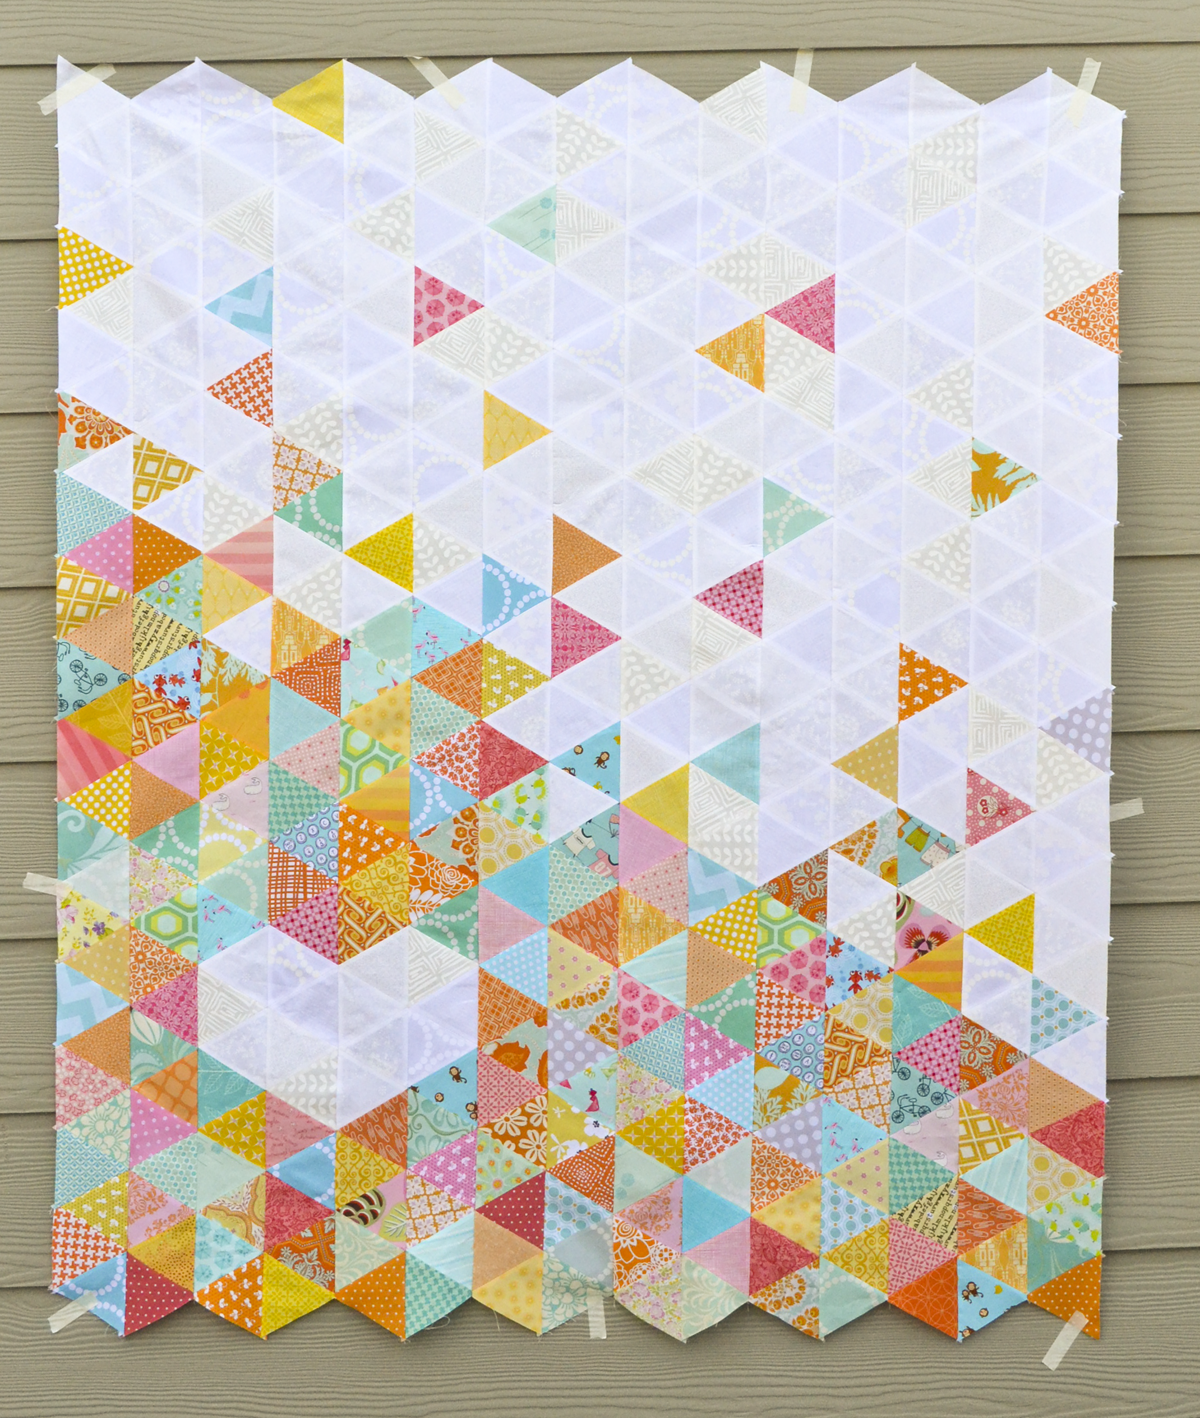


The quilt ended up measuring around 50 inches by 60 inches. I haven’t yet decided if I’m going to trim the top and bottom rows off to make the quilt square, or leave the jagged edges.
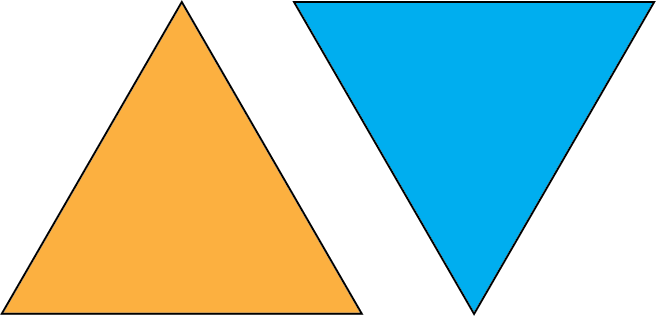
Are you ready to make one of your very own!?! First head on over to Fresh Lemons for her tutorial on cutting out equilateral triangles. My triangles started out as 4 inch strips, so the math even works out!
First up…How to piece the triangles together
Full disclosure: I am usually a press the seam to the side kinda gal. I personally think its easier to match points if they nest. That said, this quilt is far easier to make if you press your seams open. As long as you machine quilt the life out of it, after you are done the quilt should stand up fine over time. Before we look at how the whole quilt is constructed, let’s review how I pieced my triangles.
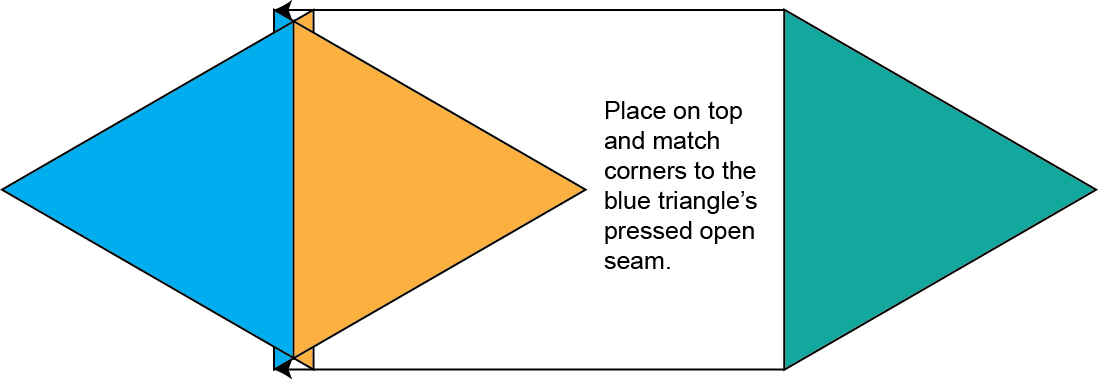
You are going to start off by placing two of your triangles together, right sides facing. Sew a quarter inch up one side.
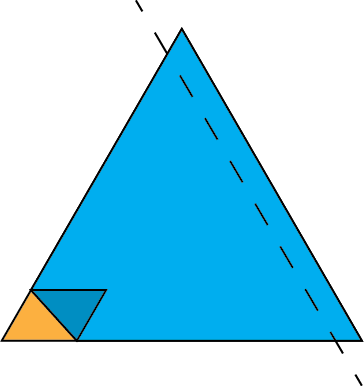
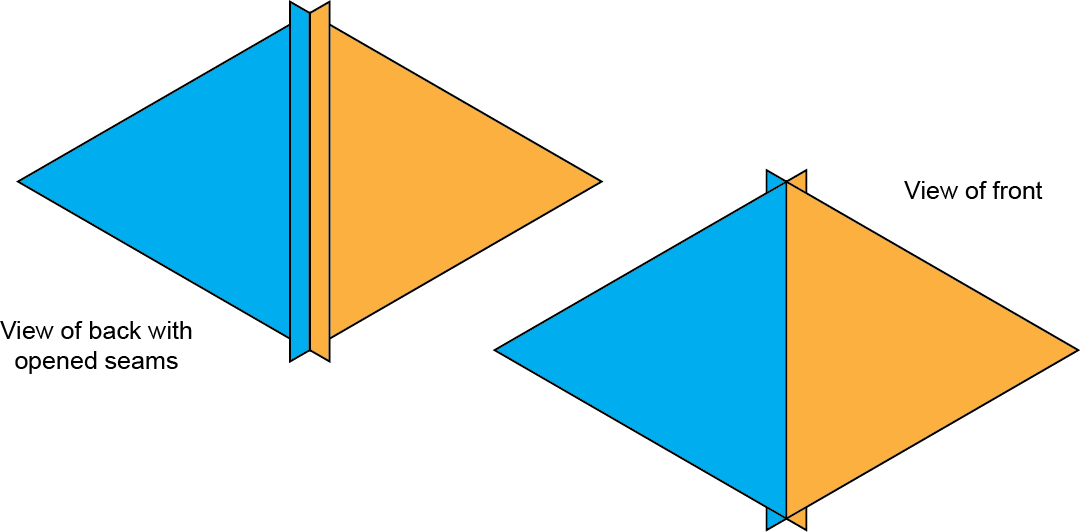
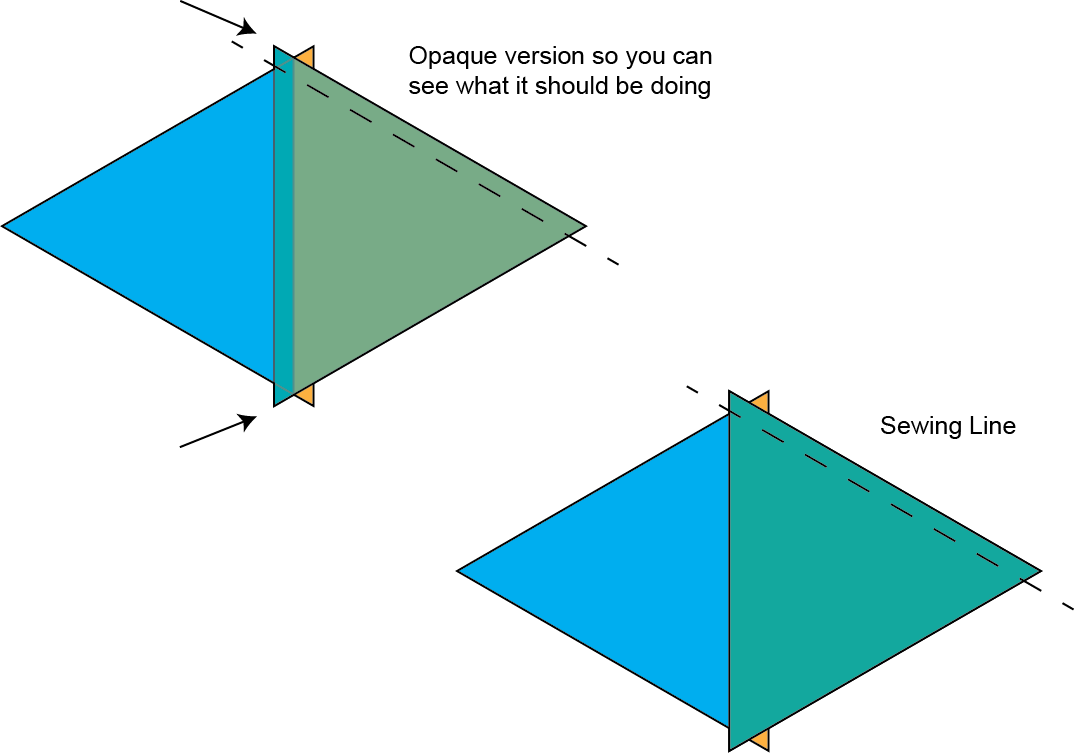
Time to press! As I said before, I think its easier to sew these types of triangles together if you can use the corners of the pressed open seams as guides. Take a look at how the piece should look from the front and back:
Now that you have the seams pressed open, you will use those corners as guides. You are going to place the next triangle, right sides together, one on top of the other, just as before. Instead of worrying whether or not you’ve offset the triangle enough, use the openly pressed seam as your guide.
Voila! You have three triangles sewn together and you can keep adding on. I like chain piecing, so I will sew triangles together in sets of two, and then put sets together to make into sets of four, etc. Goes a lot faster that way!

Quilt Configuration
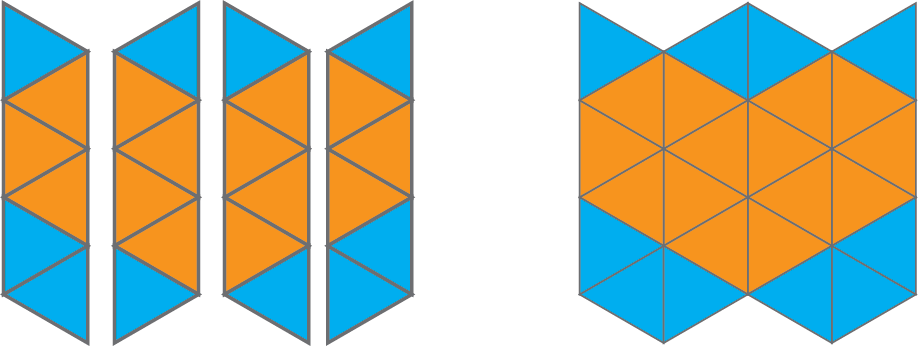
Okay, now that we know how to piece the triangles, let’s look at how the quilt actually pieces together. This quilt is made up of columns instead of rows. For my quilt I made 15 columns of 29 triangles each. Essentially you are sewing together rows of 29 triangles and then turning them on their side to form columns.
Sew your triangles together like this:
![]()
Then turn them on their side and line them up as columns like this:

Finally, sew together your rows and you have your quilt!
The Heart
The heart is made up of 14 triangles that span 4 of your rows/columns. Use the coloring diagram at the bottom of this post to figure out where you want to place your heart, and pay close attention as you piece!
The possibilities are endless!
Initially I started out wanting the triangles to be white, every other triangle, like the two options below (forgive the colors, these were quickly illustrated files). Ultimately the heart just wasn’t visible enough, which is how I ended up with the cascading triangles.

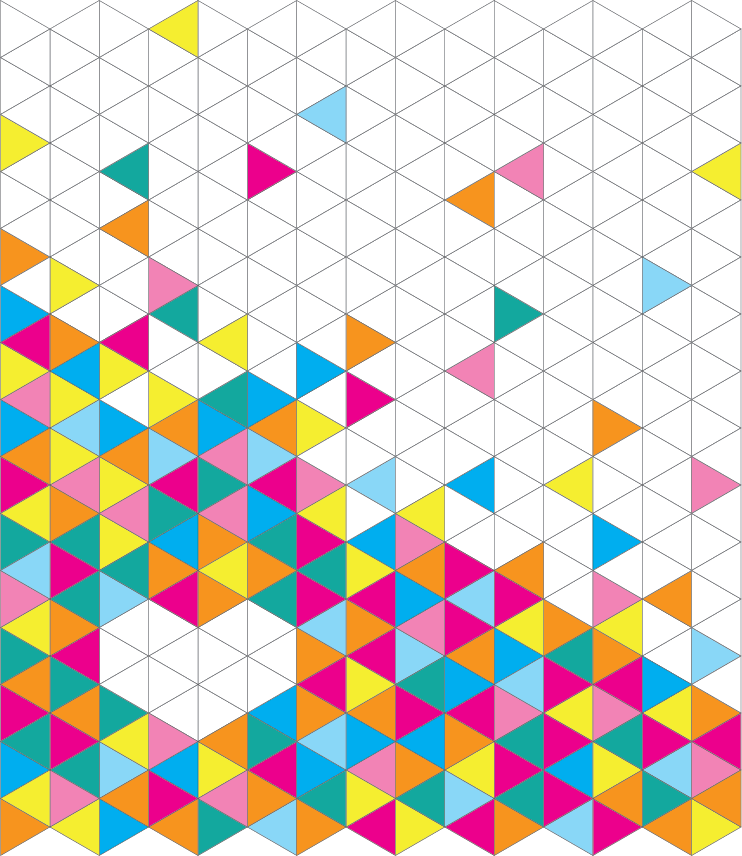
I’ve included a diagram below so you can color your own heart quilts and use them as a reference when piecing your triangles. I also came up with a couple of other fun colorways in Illustrator I thought I’d share. Here is a rainbow version:

My favorite is a gradient heart quilt. I think I might make this one and enter it in our local quilt show…if I do I’ll be sure to post pics!

Coloring Diagram 🙂 Just click on the picture and print! Hopefully it prints out properly on 8.5 x 11 inch paper. Like with Water/Waves, I included more rows and columns just in case you want to make your version larger. You can also adjust the size of your triangles to make it bigger.


This quilt is so stinking cute! I love it with the zig zag edges!
Totally fabulous! The rainbow version with the red center reminds me of Zelda. Because I’m one of those old school Nintendo quilty nerds, you know 😀
That looks beautiful, and the tutorial looks really good! I’ll give it a try.
I love this quilt! I like the shape of this heart better than the one I just made with HSTs. I’m pinning this for my next heart project. Thank you for sharing the tutorial!
I just love this–and I just got my new equilateral triangle die and will enjoy cutting this up! Thanks for sharing!
This is gorgeous! I’ve been searching for just the right design to use for an auction and this is it. Thanks for the tutorial!
Awesome! I’d love to see the finished quilt when you’re done!
I finished! Thanks again for the perfect pattern for this cause 🙂
http://www.flickr.com/photos/allierae/14040285482
Very good tutorial! You did a fantastic job on the design layout. Have you seen the Moda facebook page for the Sochi Olympics quilting theme? You need to post your quilt there. Great Job! Very pretty overall composition. fyi, my regular email is:
celiambrose@hotmail.com
Thanks for the tip Celia! I’m going to go check it out. 🙂
Your quilt is amazing! Thanks for sharing the tutorial – one more quilt added to my list!
Awesome! I hope you post photos when you’re done, I’d love to see how others interpret the pattern!
Gorgeous quilt and very nice tutorial. Just this weekend I made a Thousand Pyramids quilt out of similar colors. I had never worked with equilateral triangles before and I expected it to be difficult, but you’re right, it was quite easy. I wish I’d seen your post before I made mine though – I pressed to the side and now realize how much easier this could have been pressed open.
Gorgeous quilt top! And a fantastic tutorial as well! Thanks, i’ll be pinning for future use!
So creative! How wonderful of you to share your process and tutorial with all of us. I’ve added this to my to do list too!
Love it! I’ll be pinning this for future reference – thanks for all the diagrams 🙂
Oops – I just commented with my husbands account :p
Wow, I love the way it sprinkles upwards like it’s flying away! Such a powerful image. 🙂 I really love that effect. Thanks for sharing the tutorial!
Gorgeous quilt, and I love it with the jagged edges.
Love this! What a fun design and colors
Wowzers! I think you’ve started a new trend here! Must try this and thank you for the tutorial 🙂
This quilt is wonderful and all of the possibilities look great as well! It makes me want to start one now. Thank you for the tutorial.
I really love this. My love and desire of triangle quilts had been waning of late, but your cascade quilt makes me want to cut triangles all night to start laying one out. The cascade diagram is also gorgeous. I definitely think you should make that one!
I love the jagged edges. They go with the falling up triangles. This is just so cool. Nice work!
This is so awesome! I love the way the jagged edges look, but binding them is a nightmare! I tried it once and will never do that again. 🙂
What a lovely quilt. I’m just starting to experiment with equilateral triangles. Love all your different colour options too. Wonderful 🙂
This is such a lovely quilt and what a gorgeous pattern!
I love love love this! The colors are fantastic! And the design! love it!
This is a great quilt. Not your typical valentine’s colors–which makes it interesting.
I love your quilt. The confetti, the heart… all of it is great! I also like how it’s not in valentines colors and you could use it all year round. Very nice work and thanks for the tutorial!
This is just beautiful! This is one I really want to make!
I saw Allison’s quilt and she directed me here. I’m thinking of making this quilt for my daughter – I really think she would love the modern take on this heart quilt. I love the gradient heart. Thanks so much for the tutorial and color page.
Thank you for a great tutorial and beautiful inspiration! I have enjoyed making this pattern so very much! And I’m very happy with the result 🙂 thanks again!!
how much white fabric do I need for this quilt?
It depends on how big you want it and how big your triangles are. I made mine scrappy and pulled from a lot of different collections, so I honestly don’t know how much fabric I ended up using. For variation’s sake I’d grab at least 10 fat quarters of print fabric and a couple yards of white.
I am planning on making this quilt for my grandson, who is due May 1st. Has anyone made it as a baby quilt and, if so, could you advise the quilt size (size of triangles, number of rows, etc) and approximate amount of fabrics that would be needed? I have a toddler flat crib sheet which we will be using as the “main” pattern. I have never made this type of quilt before so any help and/or ideas anyone could provide would be very much appreciated!
Hi Carol! I think you’d be alright using 4 inch strips to cut your triangles like I did. My quilt ended up a little square, so you could probably leave out the last two or three columns to make it crib sized. Perhaps 28ish triangles per column, by 12-13 columns wide. I would start with 10-15 fat quarters for your color triangles and a couple of yards of white for the white space.
love love this tutorial. Here’s mine

Favourite quilt I’ve ever made
I love it! Awesome job!
I think I commented in the wrong place initially! Can’t wait to start! How’d you make your white triangles look opaque and with a slight border? Thanks so much! Can’t wait to get started!
Hi Cecilia! Sorry for the delayed response. I think you are referring to the seams you can see through the quilt top since I haven’t quilted it yet? Using white fabric will often have this effect, as its more see-through than colorful fabric. The effect goes away a bit once you quilt it on white batting. 😦
I just finished my version of this quilt! It’s my first quilt and I’m totally hooked now!