Must Love Illustration

No quilty posts today, I’ve been busy working on secret Christmas projects and in my spare time attempting to establish an illustration “style.”  I loved drawing as a child and really wish I had gone to art school so that I could have had mentors help me develop my drawing strengths and weaknesses. I find I have too many styles that I enjoy, and it is hard for me to pin point a particular aesthetic that screams, CORINNE! So, my goal is to just draw tons of stuff and at some point look back and see if there is some sort of cohesive style I can develop.

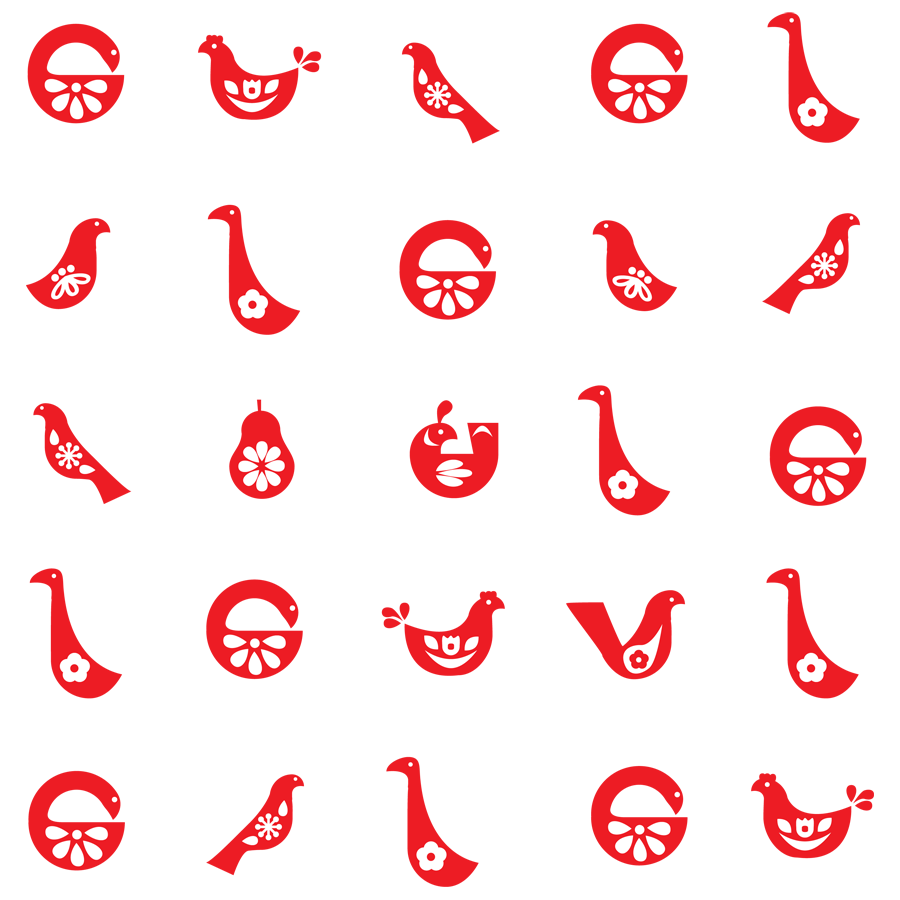
I love folk art, and have been drawn to Scandinavian folk art for some time. It’s been really trendy as of late, so I thought it might be fun to design a simple yet modern applique Christmas quilt based on the style. I started drawing birds from the 12 Days of Christmas and arranged them as blocks, seen below. I thought it might be pretty appliqued red on cream, and perhaps hand applique other flourishes in white on the cream surrounding the birds? That part isn’t illustrated but you get the idea. I can’t decide if I like it enough to actually make it.

I’d also like to design a collection of fabric to print on spoonflower.com this year. I’ve been tossing several ideas around, but whipped up a cute polar bear pattern I think could be fun. I’m still developing the idea, but think its coming along. Faces have always been the simple part, but I am terrible at drawing bodies, whether animal or human.

Polar Bears

Last but not least, I REALLY want to draw some cat fabric. I volunteer bottle feeding orphan kittens with Austin Pets Alive and currently have two fosters kittens at home. Have y’all seen the “Pin all the things!” stick cartoon? I thought it would be cute with a kitten twist, so I whipped this up and think it would be a fun tshirt.

I’m hoping to have some actual quilty stuff to post soon.

Water/Waves Tutorial

Okey Dokey, here is my first attempt at a tutorial…feedback encouraged! Hopefully at least some of this makes sense. 🙂

I’m going to explain the ridiculous way I figured out how to do the gradient water/waves quilt. It is entirely possible there is a better way to do this, but this way worked for me, so hopefully it works for you!

First let’s take a look at the pattern repeat. The quilt is made up of two rows that repeat as many times as you’d like them to. You can use a variety of colors, but for this version I chose a six color version, seen below.

Must Love Quilts Water/Waves Tutorial

Here is a better look at how the blocks are pieced together to make up the rows:

Must Love Quilts Water/Waves Tutorial

As you can see above, there are 2 rows of 6 blocks each. All of those blocks will be made via strip piecing. Each strip set will produce 4 blocks, which is enough for a lap size throw in the end if you do 6 blocks across. To make the quilt shown in this tutorial you end up needing 12 strip sets to produce the 12 blocks above.

Now it is time to figure out the pesky colors and how many strips of each color you need. First, number your chosen colors (I literally pinned a piece of paper with a written number to each color fabric). Next, using the pattern repeat diagram and the colors chosen, number the colors and where they occur in your diagram, like below.

Must Love Quilts Water/Waves Tutorial

Now go through and count the number of times each color appears in the strips (ie; how many times the number 1 appears in the diagram, etc), and presto, the number of strips you need of each color! Write this down by your chosen colors and get to work cutting out your strips. Again, I kept the color number pinned to each stack of strips so I wouldn’t get confused, especially if you are using similar colors!

4

I cut my strips 2.25 inches so that I could end up getting 4 blocks per strip set. You can use 2.5 inches, but you only end up getting 3 blocks per strip set with a bunch of leftover fabric.

Must Love Quilts Water/Waves TutorialAfter you’ve sewn your strips together it is time to cut them down to size. If you used a scant 1/4 inch as your seam allowance you’ll end up with your strip set being 9.25″ from top to bottom, and 42-44″ in length. Measure and cut down to 9.25″ squares.

Must Love Quilts Water/Waves TutorialI next laid out my blocks according to the diagram and the repeat pattern. The lap size quilt is made up of 4 sets of the repeating pattern. See below:

Must Love Quilts Water/Waves Tutorial

Now, piece together your columns:

Must Love Quilts Water/Waves Tutorial

After you are done with your columns, sew them together and you should end up with something like this:

Must Love Quilts Water/Waves Tutorial

I went ahead and put together a diagram you can print and color in, since everyone doesn’t have the luxury of Adobe Illustrator. Works the same way, just color, number, and sew! The diagram includes more rows and columns than the tutorial quilt, just in case you want to try more colors.

Must Love Quilts Water/Waves Diagram

If you end up making one, I’d love for you to comment on this post with a link to your blog post about it! Happy sewing everyone! Here is the blue version I have yet to quilt (Blogged here):

Waves


Waves in the Wind

Everything is a work in progress

It’s officially the time of year where I get to work on Christmas presents, which also means content for my blog will be lacking until after the holidays. With my focus on several “top secret” projects, there is only so much time to sew my two million random ufos. I actually have made a ton of progress on my Winding Ways, but still have a lot more to go. I’ve been piecing in units, which makes it a bit easier to handle because you do the same motion over and over again instead of going from one step to the next.

I also decided to try my hand at Amy Butler’s Weekender Bag. I’ve seen so many awesome ones I couldn’t resist giving it a whirl. I only have one pocket panel done so far, but I think it will be fun!

My last WIP is to get a tutorial up on how I figured out my Water/Waves quilt. I’m halfway done with the post and hope to get it online this week.

Linking up to Freshly Pieced for WIP Wednesday!

October on my mind

So you know how much I love fall. The only thing that keeps me from getting sad after Halloween is over is knowing Christmas is around the corner, otherwise I’d be totally bummed out, winter just isn’t my thing (one of the top reasons I now live in Austin.) I do miss the East Coast’s autumn though. I have many fond memories of driving through the Blue Ridge Mountains to and from college, going to Halloween houses with my sisters, and pumpkin picking with my family as a child. My dad turns our house into a haunted haven each Halloween, and kids are always met with large bags of candy. No scare tactics, just spooky fun. I hope to one day carry on the tradition, but living in an apartment doesn’t afford that opportunity just yet.

I have almost completed piecing my Not So Modern Maples quilt top, just need to add 4 inch squares around the entire top as a semi-border! This photo is terrible, the sun is going down earlier now and I just don’t get home early enough during the week to take sun-filled shots. Maybe I’ll remember to get one this weekend! In the meantime, here is my progress.

maples

Last fall I fell in love with all the wonderful wreaths you find on pinterest. I came across this tutorial and wanted a similar product. I ended up using a wire wreath frame and sewing instead of gluing. If glue is your thing, that is cool, I just find it weighs things down too much, and it takes just as much time as sewing large stitches, so why bother. I made the black and white wreath below last year and it has been hanging out on a shelf in my laundry room flower-less all year. I busted it out this weekend and finally whipped up some lovely flowers to make it festive. I made a ton of these flowers in red last year for my Christmas tree, and thought they would look awesome on this wreath in orange. Again, I didn’t use glue, I sewed the petals on. The glue weighed the Christmas flowers down and took way too much time to dry. The only perk of glue is you get to peel it off your messy fingers when you’re done, but that doesn’t outweigh the cons in my opinion. 🙂

wreath square low res

This wreath is hanging on my wall above my computer at work so that I can enjoy it. It took a year to finish, but I like how it turned out.

wreath portrait low res

WWIP – Winding Ways In Progress

Going to keep this short today. Almost done putting my Not So Modern Maples top together, hope to take pictures and post soon. Now that my autumn themed quilt is almost ready for quilting, I am again working on something beachy. I cut out a million and half pieces of the Winding Ways quilt a while back on an Accu-quilt, and did 4 or 5 practice blocks (not the ones posted below, they came after lots of practice). I have to admit, I was ready to give up. I’d cut it out though, so it is going to happen! I think I’ve found my groove, it involves A LOT of pins. I only have four decent blocks done, but I have a big pile of various parts pieced together. I also realized I didn’t cut out enough pieces from four of my fabrics. Going to have to figure that out, I’m not cutting these out without an Accu-quilt!

Linking up to Freshly Pieced WIP.

Falling for Autumn

Autumn has always been my favorite season. Nice weather, orange leaves, football, pumpkin spice, Halloween, what’s not to like?! Now that I live in Austin I enjoy it even more because I know a frigid cold winter no longer follows. This past weekend we finally dipped down into the 80’s and I decided I just HAD to make an autumn quilt. I’ve been ogling the Modern Maples quilts the Emerald Coast Modern Quilt Guild has been working on from the Pretty in Patchwork: Holidays book by Lark Crafts. Maple happens to also be one of my favorite things on the planet, so this is a match made in heaven. If calories didn’t count, I could drink maple syrup straight from the jar like Elf, no joke.

I also happened to stumble upon THIS gorgeous quilt by Karen Black of Bungalow Bay Quilts. I can’t even descibe how in love with this quilt I am. I’d love a replica for myself, but instead decided to incorporate some of this inspiring quilt into a different version of the Modern Maples quilt. I’m going to call it my “Not So Modern Maples” quilt. My layout isn’t at all asymetrical, so I won’t even try to pretend it’s modern. I also picked out a bunch of non-modern fabrics this go round, I think it will be the most traditional quilt I’ve made!

This weekend I sewed up a ton of maple blocks, they work up very fast! I used a variety of oranges, with a few grey and maroon ones worked in. Not quite enough contrast if it were purely going to be maples, but perfect for what I’m ultimately going for.

maples

I’m incorporating the black and white nine-patch blocks from the star quilt to make it a little more “Halloween.” I worked up a bunch of nine-patches last night using the neutrals I used in the background of the maples. I like where it is headed, but I’m not quite there yet. I either need to take out the darker neutrals, or strictly stick with white neutrals. I’m going to work up a few nine-patches following both of those ideas and see what I like best. The leftovers can go on the back.

with-black

See what I mean about some of them being too dark? I only have about half of my maples up on the wall for the photos with the black and white nine-patches.

outlines

This weekend I’m heading to a Sew-in with the Austin Modern Quilt Guild at Honeybee Quilt Shop up in North Austin. I hope to make some more progress then!

Linking up to WIP Wednesday by Freshly Pieced!

Lessons Learned – Experimental Color Play

5

People who know me know I love the water. Beach, lake, river, pond, pool, take your pick. I find it impossible to resist fabric with nautical themes, and in a perfect world I would live at the beach. Alas, I cannot afford that lifestyle so I make do by obsessing over anything beachy.

I have only been quilting for about two years (one of which was spent making just one quilt, so I don’t know if that counts), and I have found that while I love modern quilting, so far I’ve definitely leaned towards traditional quilts with modern fabrics. My most recent quilting goal is to turn some of my modern quilting ideas into reality. I came across this gorgeous quilt a while back on pinterest. The colors are right up my alley, and I thought the design really modernized what I believe is the rail fence pattern. To be entirely honest, I wanted to copy the quilt exactly, the coral orange would be perfect for my bedroom. Ultimately I decided to try something different and quickly picked yellow and grey as my two main colors. I went to work sewing the strips of a light yellow and light grey together, and in a matter of days had enough blocks to make a lap size quilt. I threw the blocks onto my design wall and sadness washed over me. It looked washed-out and I just didn’t like it. I couldn’t put my finger on it until my mom remarked that the colors were both too light, and there wasn’t enough contrast. I have a hard time completing quilts I don’t like, so I put the blocks away to be used another time and set out to come up with another plan.

I played around again in Illustrator and thought it might be neat to use different shades of blue and I arranged them in a way that reminded me of the depth of water, or ocean waves. I choose my pallette, keeping contrast in mind considering my failure with this pattern when I tried my beloved yellow/grey combo. I had so many lovely Kona blues to choose from, and my initial pallette didn’t contrast enough, and I feared the quilt would again look washed out, with the pattern getting lost. I settled on the colors above, worked up a strip-piecing plan, and got to work piecing the blocks.

Overall I think the concept is more successful than the grey/yellow scheme (which I can’t even bear to show you!) but I think the concept would have been conveyed better if there were LESS contrast this time. I can’t win! I still have a ton of Kona blues that I want to use to piece a similar quilt, with less contrast, so that the flow of the “wave” is more gradual. The quilt top works up VERY quickly, thanks to strip piecing, so hopefully within the next couple of weeks I’ll have another version to share. I want to quilt the version above with a water type pattern on one of our local quilt shops’ long-arms. The quilt is slightly smaller than a twin right now, the perfect size to drape over my couch.

3

Linking up to Freshly Pieced for my first WIP Wednesday! Woohoo!

Binding into the night…

Tonight is the September meeting for the Austin Modern Quilt Guild, so I stayed up until 1am last night watching the new season of Hell on Wheels and binding this sucker so I could take it to show and tell. Overall it turned out okay, though I wish I had done the quilting differently. I ultimately thought the design was busy enough, so I just did simple stitch-in-the-ditch quilting around the blocks. I also almost had an anxiety attack when I put in the washing machine, thanks to the red fabric (Thank you Shout Color Catchers!). The red actually didn’t bleed at all, the color catchers were still pretty white after the initial wash.

There are a TON of things I’d do differently the next go round with this pattern. I wouldn’t have thought so hard about color placment on the intial strip sets, and would have varied them more. I also think it might be fun to toss in a print or two throughout. This quilt ended up being a smidge smaller than twin sized, but just large enough to snuggle into! It is by far the most modern quilt I’ve finished, and overall I’m pretty happy. I am hoping to post a little strip-piecing tutorial in the next week or so, stay tuned!

I leave you with a ridiculously cute picture of my Annabelle snuggling into one of my quilts.


Preppy Knee Socks

So I have been obsessed with the idea of making quilts entirely out of solids since the quilting bug bit me two years ago. The main obstacle in my way has been the gorgeous print fabric that screams, BUY ME! USE ME! I’m helpless when it comes to gorgeous print fabric. Nonetheless, last month I decided to tackle a modern quilt with solids. After some pinteresting around, I settled on Preppy Knee Socks by Elizabeth Hartman. I’m a sucker for her quilts, and this one is no exception. I recently sent my Planetarium quilt off for quilting, and I have Rapid City in the works. It seemed only natural to keep following this trend. Plus, knee socks are near and dear to my heart. Check out this picture of me 8 years ago with my company dodgeball team.

After I chose the pattern, it was time for color choices! I’m lucky that I know how to use Adobe Illustrator, so I started by whipping up the quilt template and then started playing around with color schemes. The process was quick and dirty, but here are a few I ended up enjoying.

The Winner

I started this quilt at a recent Austin Modern Quilt Guild Retreat and picked the winning color scheme based on the fabrics a local quilt shop had in stock. Here is my progress so far, sorry for the terrible photo, I’m working on it!

knee-socks-quilt

I’m planning on making the quilt twin-size, only a handful of blocks to go! Elizabeth Hartman’s instructions were based on making the quilt from fabric scraps, but I chose to strip-piece it because A) I’m lazy and B) It is WAY faster. Thinking about doing a tutorial in one of my next posts, we’ll see how ambitious I feel. That is all for now! I leave you with a ridiculously cute picture of a former Austin Pets Alive! foster kitten sleeping on my window.

sleeping-kitten

Former Blog Cynic

I have to admit, I never thought I’d start a blog. I’m not into journaling, and I can’t figure out why anyone would actually want to read one of my posts. I’m not much of a blog-reader myself, I’m a blog picture-viewer. I read blogs like I read the news, headlines and photographs. I’m not sure how this whole thing will evolve, but hopefully I’ll learn a few things along the way, and share some fun stuff in the process.

My involvement with the Austin Modern Quilt Guild is the main inspiration behind blogging. I’m so inspired by the online quilt community, and after seeing all the blogs out there I felt kinda left out! After realizing this is entirely my own fault, I adjusted my blog-cynic views and decided to get my feet wet and see where it goes. I’ll be sharing projects, ideas, inspiration and hopefully lots of pictures of adorable animals. Speaking of adorable animals, check out my sweet babies, Itsy Bear and Liberty, aka Libby.

That is all for now! Hoping to actually post something quiltastic tomorrow for WIP Wednesday! 🙂